Zapier is a great third party tool to let you send postcards
Zapier is a great third party application that allows for 5000+ apps to connect and interact with each other. It will allow you to integrate your CRM with Stannp without needing to know anything about REST APIs. It simply functions as a work flow chart. When something happens (Clicking a button in a CRM), it will trigger something else to occur (Like sending a postcard from Stannp).
Here is a guide to let you use the Send Postcard event in Zapier.
Sending postcards
Select the Create Postcard Event.
This will allow you to send 4X6, 6X9, 6X11 postcards. Additionally, this is how you can send our 17X11 self mailer along with the 8.5X11 fold self mailer.
If you are feeding data in from your CRM you should be able to link each box appropriately. Recipient Address 1, and Recipient Postal code are required fields.
You also need to ensure you've highlighted what design you wish to use for the send. Either, upload an image to the front and back sections or reference a template that has already been created on our platform. We will always recommend setting up a template on our platform first. This is so our sales team can review the design and ensure no unforeseen issues may arise.
However, if the design of your postcard is completely different for each send, we would recommend using "front" & "back" instead of "Template". Although we can use variables to change around names, dates, and various other pieces of data, if you need to change the whole postcard, it can be simpler to just sending us the already generated PDF/JPG file.
If the data is not feeding through well from your CRM to Zapier you may need to discuss this with ether your own CRM's or Zapier's help desk. As this is a third party service, there is a limit to how much we can assist.
Once you have mapped the correct fields we recommend setting test to true and testing that everything is coming through correctly a few times before getting the show on the road.
If you wish to know how to setup the letter Zapier event click here!
Adding variables to Zapier
When sending postcards with Stannp we pride ourselves with the quantity of custom variables you can use on your design. However, to access custom variables on Zapier they need to be setup beforehand on the Stannp Platform.
Log in to your Stannp account and go to your mailing list (view recipients).

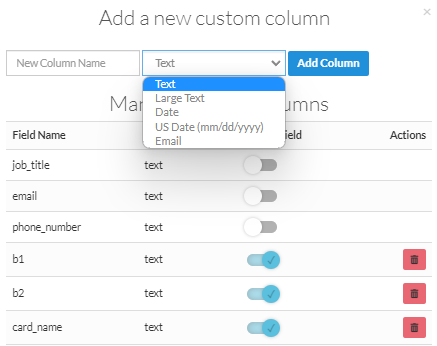
Then select manage columns. This will bring up all of your custom variables that you've setup in the past. There may be a few items here by default.
 From here you are able to;
See all of your created custom fields.
Add new custom fields.
Delete custom fields.
Decide whether you would like the custom field to be visible when reviewing your mailing list data.
Simply type in the name of the custom field you would like to create, decide it's category, then add the column. From that point onwards it will be selectable when uploading your mailing list.
Once the variable has been setup on Stannp you will then be able to see a new option added to the list of your Zapier variables underneath "tags".
