Recently upgraded (April 2026): What's new
We've significantly improved the data upload experience. Here's what's changed:
- Smarter column matching: your columns are now automatically matched to recipient fields, so you spend less time manually mapping data
- Real-time progress tracking: see exactly where your import is up to as it processes, rather than waiting to find out
- Better duplicate handling: set your duplicate preferences once and they're applied across the whole file
- Faster uploads: up to 480x quicker than before, so you can go from file to campaign-ready in minutes
To send your direct mail campaign you'll need a mailing list (recipients). You can upload this as part of a campaign setup journey or from your dashboard, at any time.
Downloads available to support you in preparing your recipient data mailing list here: Example data file and supporting Recipient data template guide
Once your mailing list is ready, here's a step-by-step video, and separate click-through guide, for uploading your recipient data:
Important points when uploading your data
Single sheet data files
Only single sheet data files can be accepted. CSV is the accepted file type as this only saves as a single sheet document. Stannp.com will convert alternate file types (such as xls or xlsx) to CSV. If your files contains multiple sheets, only sheet one will upload. This means any data or formulas, on others sheets, will not be saved.
Essential address data
Address line 1 (house name/ number and road name) and the postal/zip code must be mapped correctly in order to verify against the postal provider database (Royal Mail, USPS etc.). Addresses that do not match will save as unverified. These may still deliver and may incur an additional cost.
Read more about Address Verification here.
Retain zip codes and other cells starting with '0'
To ensure cell content, such as Zip codes or other reference numbers, starting with '0' (zero) are accurately retained in your data file, you should untick the 'Remove leading zeros and convert to a number' (image 1 below) option in your Excel settings or convert your cell style from 'General' to 'Text' in the 'Home' tab (image 2 below)
Image 1: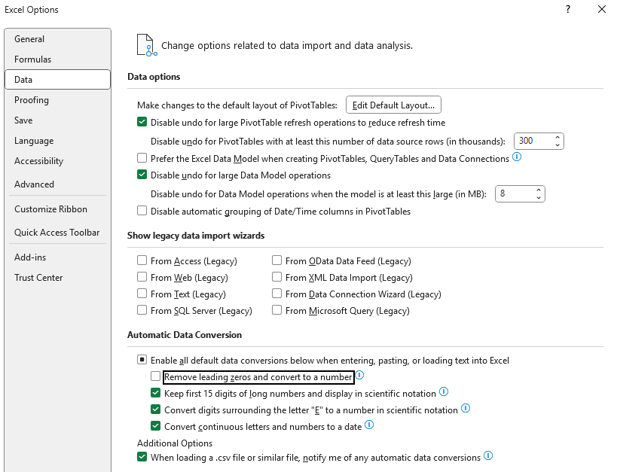
Image 2:
View and manage all of your recipient groups in one place
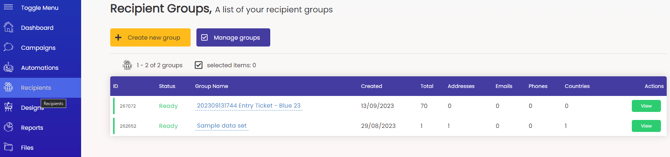
Click 'View' on your recipient group to view, edit, add to, and manage your recipient data within that group.
Need data?
If you don't have any data yet, you can always buy data from us instead! Get in touch
Adding data with custom fields
 If your data file contains any custom column headings, these will automatically be uploaded with your data file. You can choose to map these or skip them (untick the heading or select 'Skip Column').
Previously added matching custom fields will map. Example below: 'birthday' was previously added and has mapped.
New custom fields (column headings) will be created as 'New Custom Field' and will match next time. Select the preferred data type from second drop down list.
The options are dates with two format options and single or multi line text. Image examples below.


When using custom variable fields we always recommend making the variable first in the column settings rather than generating it here.
Read more about creating custom variables here
The final steps:
- Name the recipient group so it's easy to find later (or add these recipients to an existing group)

- Decide what should be done with any duplicate entries that could feature in this upload or in your other recipient groups, and what data should be used for the check. (Info below.)

What does each duplicate action mean?
Update any matching duplicate with the newest data imported - We will update the existing recipient record (if previously uploaded and still present in 'All recipients') with new data and keep them in this group.
Do not import any duplicates -If any recipient features multiple times in this upload, or is live in your 'All recipients', they will be skipped and not uploaded.
Insert all duplicates as unique records - Your full data set will be uploaded. Each with new unique recipient IDs.
What does each duplicate check option mean?
If full name and address matches - First name AND last name AND address line 1 AND postcode/ zip code must all match to identify as a duplicate record.
If firstname initial plus last name and address matches - If multiple recipient records (the same person or multiple people) share the same first name initial AND last name AND address line 1 AND postcode/ zip code, only the last one listed will be retained and uploaded.
If address matches - Address line 1 AND postcode/ zip code.
If email address matches - Only the email address will be checked. Skips records without email addresses.
If reference ID matches - This is your recipient data mapped to the 'Reference ID' list option. Skips records without reference IDs.
Finally, select your default country and and click 'Import Recipients'.
Once uploaded, more details will be made available to show processing results and address verification status.
Select the data when creating a bulk campaign and you're off!