How to Set Up a Webhook in Klaviyo to Create a Letter Using Stannp API
This guide explains how to use Klaviyo's webhook functionality to automate letter creation using the Stannp API.
Prerequisites
- API Key: Obtain your Stannp API key from your Stannp account.
- API Endpoint: Use the following endpoint for the webhook:
https://api-us1.stannp.com/v1/letters/create - A Flow in Klaviyo: Create or open a flow in your Klaviyo account to integrate the webhook.
- Recipient Data: Ensure that the necessary data (e.g., recipient name, address) is available in Klaviyo profiles or event properties.
Steps to Create the Webhook
Step 1: Create or Open a Flow in Klaviyo
- Log in to your Klaviyo account.
- Navigate to Flows in the left-hand sidebar.
- Select an existing flow or click Create Flow to build a new one:
- Add a trigger, such as "Placing an Order" or a custom event, depending on when you want the webhook to be sent.
Step 2: Add a Webhook Action
- Within the flow editor, click + Add Action.
- Select Webhook from the action list.
Step 3: Configure the Webhook
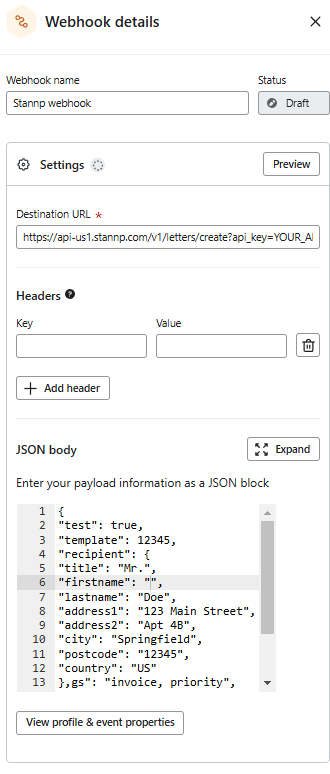
URL and Method
- Set the Request URL to the following:
Replace
https://api-us1.stannp.com/v1/letters/create?api_key=YOUR_API_KEY
YOUR_API_KEYwith your Stannp API key. - Select POST as the HTTP method.
Step 4: Construct the Request Body
Add the parameters in JSON format. Depending on your use case, you must include either the template or file parameter in the body. Use Klaviyo’s dynamic tags to populate recipient data from profiles or event properties.
Example Body with Template:

{
"test": true,
"template": 12345,
"recipient": {
"title": "",
"firstname": "",
"lastname": "",
"address1": "",
"address2": "",
"city": "",
"postcode": "",
"country": ""
},
"tags": "invoice, priority",
"addons": "FIRST_CLASS",
"duplex": true,
"clearzone": true,
"post_unverified": false
}
Example Body with File Parameter:
{
"test": false,
"file": "https://example.com/sample_document.pdf",
"recipient": {
"firstname": "",
"lastname": "",
"address1": "",
"city": "",
"postcode": "",
"country": ""
},
"tags": "contract, premium",
"duplex": false,
"addons": "FIRST_CLASS"
}
Step 5: Test the Webhook
- Save the webhook action.
- Manually trigger the flow using a test profile or event to send the webhook.
- Verify that the Stannp API responds successfully by reviewing logs in the Stannp platform.
Step 6: Activate the Flow
- Once you’ve tested and confirmed that the webhook works correctly, activate the flow in Klaviyo.
- Monitor the flow to ensure that the webhook is sending data as expected.
Additional Notes
- Dynamic Tags: Use Klaviyo’s template tags to insert data dynamically from profiles or event properties.
- Testing Mode: Use the
testparameter set totrueto produce a sample PDF without dispatching the letter. - Error Handling: If the webhook fails, check the webhook log in Klaviyo or review the Stannp API error response.
By following these steps, you can seamlessly integrate letter creation with Stannp into your Klaviyo flows, enabling automated and personalized direct mail campaigns.