Why are these required and important?
When using our designer you'll notice there are several markings and highlighted areas. These help you to create a mail item that will look great, retain all of your important mail information, and also meet the requirements set out by postal providers in the region you're sending from/ to.
Each region has strict requirements address content and placement so this can be machine read, sorted, and delivered to the right address. We print the address details directly onto mail items and also print the postage indicia stamp directly onto non enveloped items, such as postcards.
The other markings show you borders and areas for your design content to make sure this is retained in the final printed item.
Download design guides for the different formats, on our website support page and view them in the Stannp design wizard. Click the '?' button at the top of the page for the pop up that includes dimensions.
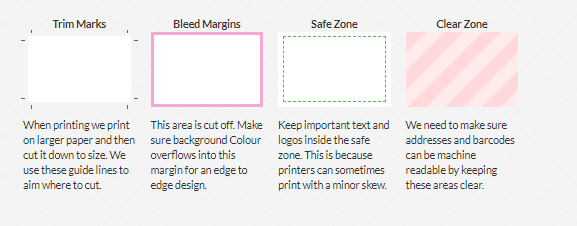
Trim Marks
When printing we print on a larger paper and then cut it down to size. We use these guide lines to aim where to cut.
Bleed Margins
This area is aligned with the trim marks and is also cut off. Make sure background colour overflows into this margin for an edge to edge design and a great print finish. (Avoids white edges showing).
Safe Zone
Keep important text and logos inside the safe zone. This is because printers can sometimes print with a minor skew.
Make sure to keep all important information outside of the Bleed Margins to avoid this being cut off of your mail items. We recommend ensuring everything is within the Safe Zone. Check your logos, QR codes, contact details, important text (your call to action, terms and conditions etc.).
Clear Zone
We need to make sure addresses and barcodes can be machine readable by keeping these areas clear. A white overlay is set by default to make sure nothing disturbs machine reading. This can be turned off in the design settings but make sure no dark colors, images or other marking encroach on or disturb the address clarity.
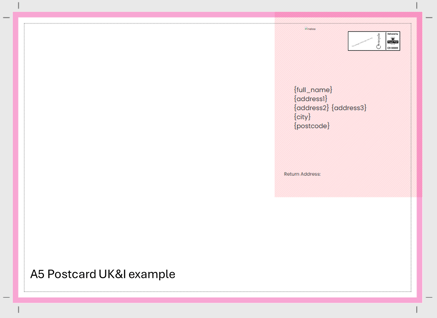
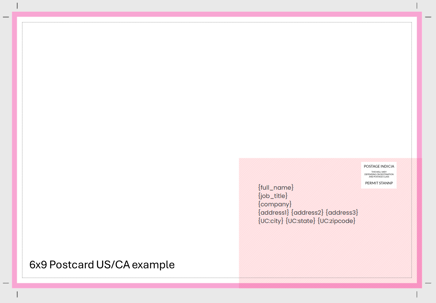
Postcards
Examples below showing an A5 Postcard (UK&I) and 6x9 Postcard (US & CA).
Letters
Letters display the required clear zone for sending in a standard C5 envelope or the larger C4 envelope.
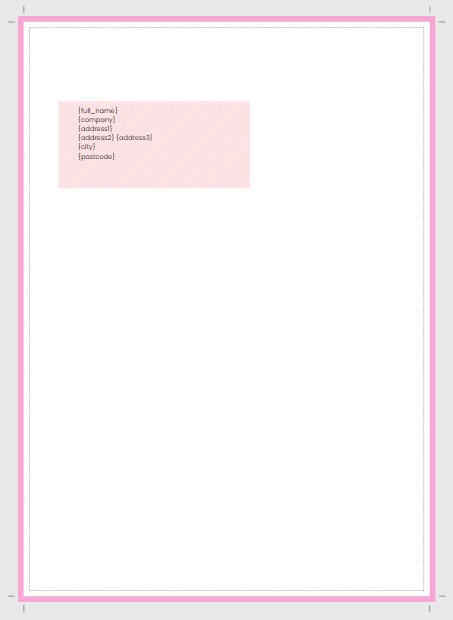
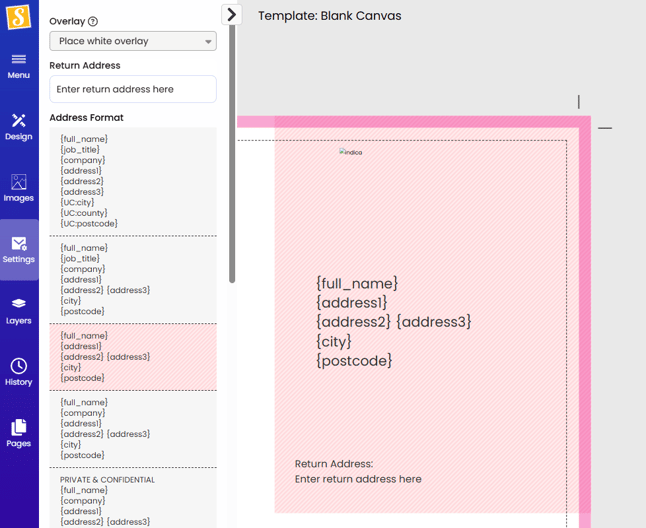
Address safe zone: White overlay
 When using the Stannp designer to create your mail, we add a white overlay to the address safe zone, by default.
This can be removed in the designer address settings indicated in the image, left.
Important note about the address clear zone and white overlay.
If you choose to remove the white overlay, leaving images, text, or other design elements across the address safe zone, leaving the mail item unreadable by the regional postal providers machines, it may incur an additional cost and/ or leave these mail items undeliverable. The address visibility is the senders responsibility.
Here is an example of a mail item with 'No overlay' selected and what Stannp.com will present at the review stage, before campaign scheduling and booking. The background image now obstructs the address being clear. This will likely not be machine readable, will result in a hand sorting charge, and may also leave the mail undeliverable.

Postcards and Greeting Cards: Add return address
In the address settings of postcard and greeting card formats, you can also add a return address. This will be printed in the address clear zone, indicated in the image below.