How to Set Up a Webhook in a HubSpot Workflow to Create a Postcard Using Stannp API
This article explains how to configure a webhook in a HubSpot workflow to create a postcard using the Stannp API.
Prerequisites
- API Key: Obtain your Stannp API key from your Stannp account within settings > API settings section.
- API Endpoint: Use the following endpoint for the webhook:
https://api-eu1.stannp.com/v1/postcards/create - Plan Requirements: Webhooks are available on HubSpot’s Professional or Enterprise plans.
- Permissions: You must have Super Admin permissions or sufficient access to workflows.
Steps to Create the Webhook
Step 1: Create or Open a Workflow
- Log in to your HubSpot account.
- Navigate to Automation > Workflows in the top menu.
- Create a new workflow or open an existing one.
- Select the type of workflow (e.g., contact-based, deal-based) and set enrollment triggers as needed.

Step 2: Add the Webhook Action
- Click the + button to add a new action in the workflow editor.
- Select Trigger a webhook.

Step 3: Configure the Webhook URL
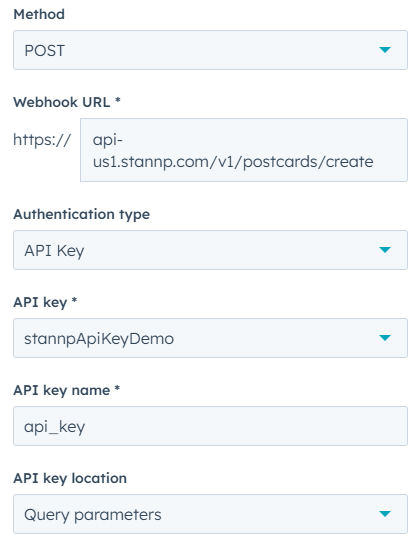
- Set the Method to POST.
- Enter the following URL in the URL field:
https://api-us1.stannp.com/v1/postcards/create
- Configure Authentication type to API Key. This will require you to create a secret with your Stannp API key. You can find your Stannp API key on your Stannp account by going to the settings and looking at API settings. Give your Stannp API key secret a name and add the API key itself as the value.
- Once you have selected your secret, within the configuration of the webhook, change your API key name to "api_key".
- Finally set the API key location to Query parameters.
Step 4: Configure the Webhook Request Body
To make a Stannp API request we require certain parameters to included within the request. These are added within this section.
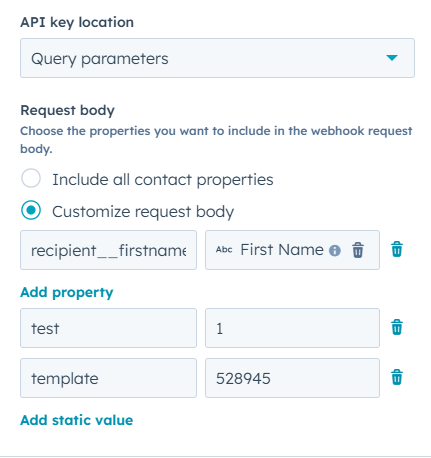
First, Select Customize request body. There are two types of parameters. "Property" & "static value".
A Property, is a dynamic value. This is taken from Hubspot You would use this to add any recipient detail as you're taking this from your Hubspot database.
A static value will stay consistent throughout each request. This is where you can add the test parameter or template when you want your design to stay consistent for every send.
Each of the following parameters can be added as either property or static value depending on whether you require them to be dynamic.
Example available parameters using Template:
size: A5-postcard
test: true
template: TEMPLATE_ID
recipient__title: Mr.
recipient__company: ABC Corp
recipient__firstname: John
recipient__lastname: Doe
recipient__address1: 123 Main Street
recipient__address2:
recipient__city: BARNSTAPLE
recipient__postcode: EX31 1JZ
recipient__country: GB
tags: new customer,postcard campaign
addons: FIRST_CLASS
Example available parameters using front & back:
size: A6-postcard
test: false
recipient__title: Ms.
recipient__firstname: Jane
recipient__lastname: Smith
recipient__address1: 456 Elm Street
recipient__city: BARNSTAPLE
recipient__postcode: EX311JZ
recipient__country: GB
front: https://example.com/front_image.jpg
back: https://example.com/back_image.jpg
signature: https://example.com/signature_image.jpg
padding: 0
post_unverified: true
tags: loyal customer
addons: FIRST_CLASS
Step 5: Test the Webhook
- Click the Test button in the webhook configuration panel.
- Send a test request using sample data.
- Review the response from the Stannp API to confirm that the request was successful.
Step 6: Save and Activate the Workflow
- Once you’ve configured and tested the webhook, click Save.
- Turn the workflow ON to start automating postcard creation.
Additional Notes
- Error Handling: If the webhook fails, check the response error in the workflow log. Common issues include missing required parameters or incorrect formatting.
- Testing Mode: Use the
testparameter set totruefor testing without actually sending a postcard. - Dynamic Tokens: Use HubSpot tokens for personalized and dynamic content.
By following these steps, you can automate postcard creation with the Stannp API directly from HubSpot workflows. For further assistance, contact your administrator or the Stannp support team.
